
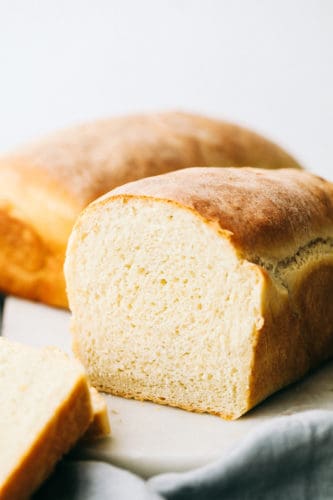
This homemade bread is always a family favorite and can be done so easily with this perfect recipe my grandma handed down to me. Making bread is easier than you think!
My miracle no knead bread is another one of my favorite bread to make but it is also just as easy as this homemade bread. Bread is so rewarding to make and tastes even better than store bought!

Perfect Homemade Bread
I am so excited to be sharing my Grandma’s perfect bread recipe with you today! I can’t believe I haven’t put her recipe on the blog until now. I get intimidated by making bread, but I knew it was time to give it a try. So many memories came to me as the bread was baking and the wonderful aroma filled through house. I remember her fresh warm bread was always ready for us when we went to visit. It was gone as fast as she would slice it up. This bread turned out just as amazing as I remember it. It is perfectly soft and reminded me of our favorite bread, Grandma Sycamores!
I am here to tell you that if I can make it, so can you! Don’t let homemade bread intimidate you. It is so much easier than you think! I have included all of the best tips and tricks for you to get the perfect homemade every time.

Bread Ingredients:
With these simple ingredients that you already have at home, this bread comes together quickly and easily. If you need to use a thermometer on the warm water that is a great way to make sure it is not too hot or to cold. Using a thermometer is the best way to know. Your yeast is also important to make sure it is
- Warm Water: The temperature should be around 105-115 degrees Fahrenheit.
- Sugar: Sweeten the bread a bit with this sugar.
- Salt: Just a pinch
- Yeast: Make sure your yeast is active and fresh.
- Flour: All purpose flour works best but if you would like a wheat flour that will work too.
- Oil: I used olive oil but vegetable oil will also taste great too.
How to Make Homemade Bread:
Only 6 ingredients to make a simple homemade bread that is delicious in every way. It is a tried and true favorite that my grandma was so generous to pass down to me. I love this bread so much and love the texture and flavor that it has to offer. The dough is made in a stand mixer but can be done by hand as well. Kneading the dough in-between each rise of the dough helps form the dough but also gets out any air bubbles. Make the perfect homemade bread with this recipe today!
- Make dough: In a stand mixer add the warm water, sugar, salt and yeast. Let the yeast proof until it bubbles for about 5 minutes. Using the dough hook start adding the flour one cup at a time until the dough combines and forms a soft dough.
- Knead dough: On a floured surface knead the dough until smooth and elastic and form a ball. Add the oil to the large bowl and add the dough to the bowl and cover. Let rise until it has doubled 1- 1 1/2 hours.
- Form loaves: Grease and flour 2 9×5 inch pans. Punch the dough to release the air. Lay the dough onto a flat surface and cut into two loaves. Roll each loaf up and place into the loaf pans. Let rise until it doubles another 1-1 1/2 hours.
- Bake dough: Bake in a preheated 350 degree oven for 30-35 minutes or until golden brown on the tops. Remove from the oven and let cool for 10 minutes before slicing.
Pro Tip from The Recipe Critic:
Make sure your warm water isn’t too hot. Temperature needs to be between 105-115 degrees.

Tips for Making Homemade Bread:
- Proof the yeast: Add the yeast to the warm water. In about 10 minutes the combination will have tiny bubbles and smell of yeast. This indicates that the yeast is still good.
- Knead dough: It is best to have the dough kneaded for a good 5 minutes. This will help flavor and texture the bread will be totally worth all your muscle strength. After the first rise just simply kneading the dough for 1 to 2 minutes is best.
- Seasonings: Add in your favorite bread seasonings and taste different bread recipes each time you make it!
- Home temperature: Baking bread is usually done during the winter months when your home is heated. The bread will rise a little quicker and doesn’t take too long. If your home is cooler during the warmer temperatures outside simply know that your bread will take a bit longer to rise. Turning your oven on to help warm the kitchen will help a bit.
- Climate outside: Yes, the weather does have an affect on bread. Usually places that are more moist will need to add 1/4 cup of flour more. While making the dough if you notice the dough is not pulling away from the sides of the bowl easily after the first rise, this will be the time to add in a little extra flour. Do not use more though because the bread will become dense once baked.
- Baked bread: To know if your bread is baked fully, use a food thermometer just like a meat thermometer. A fully baked bread will be about 190 degrees Fahrenheit. The top of the bread should be a light golden brown color.
- Storing bread: Store bread in a cool dried place and in a plastic bag that is sealed to help it last longer and stay fresh.

What to serve with homemade bread:
Homemade bread is warm and delicious! Comforting and tasty side dish or have it fresh out of the oven as a snack. Enjoy this bread with a simple layer of butter over top or with my homemade strawberry jam. This bread recipe goes perfectly with any dinner as a side or make a quick sandwich for lunch. It is so easy to make and everyone will love the fresh, warm flavor of homemade bread.

Storing homemade bread:
Usually our baked bread does not last long enough to even store it or keep out longer than that day. Now though is a great time to have some on hand and be prepared when my family does need bread. With growing boys and a bigger family, all together we are needing more groceries and bread is one of them.
- How to keep bread fresh: Simply place the loaf of bread or sliced bread in a ziplock bag or a sealed bag of some kind to keep the air out. Each time you open the bag make sure to continually close it off from the air getting into the bag and leaving it dried out. It is best to keep the bread unsliced until you are ready to eat. This is will help the bread last longer. Shelf life of homemade bread is about 5 to 7 days.
- Make ahead: Even though it is hard to make the dough ahead of time, I like to take a day and just make a few batches of this bread recipe from my grandma. This way once one loaf is gone then I still have 3 to 5 more ready for the week. I recommend baking the dough once it rise the second time. However, the dough does freeze well to make ahead and then bake frozen in the oven when needed at 375 degrees Fahrenheit for 45 minutes.
- Storing in the refrigerator: Bread does last longer in the refrigerator once stored.
- Can you freeze bread: Yes! Bread does freeze well. It is best to store tightly and correctly then place in the freezer until ready to serve. Let thaw overnight before serving.

More Bread Recipes to Enjoy:
- Focaccia Bread Recipe
- Perfect Naan Bread
- Cheesy Olive Bread
- Cinnamon Swirl Cream Cheese Banana Bread
- Blueberry Zucchini Bread with a Lemon Glaze

Grandma's Perfect Homemade Bread
Ingredients
- 2 1/2 cup warm water
- 1/4 cup sugar
- 1 1/4 teaspoon salt
- 1 Tablespoon yeast
- 5 cups all purpose flour
- 2 Tablespoons oil I used olive oil
Instructions
-
In a stand mixer add the warm water, sugar, salt and yeast. Let the yeast proof until it bubbles for about 5 minutes. Using the dough hook start adding the flour one cup at a time until the dough combines and forms a soft dough.
-
On a floured surface knead the dough until smooth and elastic and form a ball. Add the oil to the large bowl and add the dough to the bowl and cover. Let rise until it has doubled 1- 1 1/2 hours.
-
Grease and flour 2 9x5 inch pans. Punch the dough to release the air. Lay the dough onto a flat surface and cut into two loaves. Roll each loaf up and place into the loaf pans. Let rise until it doubles another 1-1 1/2 hours.
-
Bake in a preheated 350 degree oven for 30-35 minutes or until golden brown on the tops. Remove from the oven and let cool for 10 minutes before slicing.
Notes
Nutrition

![Forest Essentials [CPV] WW](data:image/jpeg;base64,/9j/4AAQSkZJRgABAQAAAQABAAD/2wCEAAkGBwgHBgkIBwgKCgkLDRYPDQwMDRsUFRAWIB0iIiAdHx8kKDQsJCYxJx8fLT0tMTU3Ojo6Iys/RD84QzQ5OjcBCgoKDQwNGg8PGjclHyU3Nzc3Nzc3Nzc3Nzc3Nzc3Nzc3Nzc3Nzc3Nzc3Nzc3Nzc3Nzc3Nzc3Nzc3Nzc3Nzc3N//AABEIAHQAlwMBEQACEQEDEQH/xAAbAAACAwEBAQAAAAAAAAAAAAAABQEDBAIGB//EAD0QAAIBAwIDBgMGBAQHAQAAAAECAwAEEQUSEyExBhQiQVFxMmGBFUJScpGhIzNisSUmksEkNDVzotHxFv/EABkBAQADAQEAAAAAAAAAAAAAAAABAgMEBf/EADURAAICAQMBBgQFAwQDAAAAAAABAhEDEiExQQQTIjJRcWGBkaEjM0Kx0VLh8FNiwfEFFDT/2gAMAwEAAhEDEQA/APuNAFAFAFAFAFALNX13T9ICi7m/jSfy4IwXlk/Ko5ms55Iw5LRg5cC+K87Ral4rawh0yA9HvTvlPz2KcD6mstWaflVe5aoLl2dPG0EmzUe0bCXrsThxftzNYzVOp5a+iJT9IjBdPfblNRu/csD/ALVf/wBeVWsj+xGtf0mZhqq5awvrS7A+5MuP/JT/ALVWKzryTUvf+xL09VRXF2jS3mWDWrWXTpGOFkkO6F/aQch9cVpHtFOsi0/sQ8f9O49VgwBU5B6EV1cmZNAFAFAFAFAFAFAFAFAFAFAee1fWLqe+bR9ACvegA3Fw4zHaKfM+rei/rXPkySctGPn9i8YpLVLgzvYwdmrPvUCG81S6mSHvV0xLO7nAJP3VHoPSolFYlq5ZNuTNlpdalaarDY6pJbXC3MbNFLBGYyrLjKlSTy58jUxlOM1GfUrSatEX1teNqt21mEUS2y5Z48hiCwwD5HBrHNjyPJLR1ReMo6VYxTMOljhxSBkhwqNzYEDpWzuGDwrhFOZGDSIIOOv/AC7SRIMERFJB756+dc/ZIx24tfCmXyNk63qSQzCxbTmvRJA0siZX4BgHAPxHn0rozZEnocbKxj1uheIbns/Et5pAlutIYb5LJsl4VP3o888D8J+lZpPD4obx9P4LWp7S5PR2N5Bf2sd1ayrJDIu5GXzFdUJqauJm006ZoqxAUAUAUAUAUAUAUAUAl7S6nPaQxWWnBW1K9bh2wbmE/E5+Sjn+lY5cjjUVyy0Ve74FF08PZi3stNgnNstw7SXOpTDO4jm3PzkbHIHoPbFZOsSUV82X87bHjRQ67o+NQtZIYpxu4ch2unPKty+FuQPqK2pTh4im8WILCZ5r5zoAn1KVBwm1O/kzFEM81TA8R6Zx9TXPctX4e79XwXdV4thmLdt4XUdcmklyoMcGI1BbpyGTg48zUSh/qZH8thdcRLYY7JtwhvboMknD/msfFWSjhd6ZvZ1z1JbkuUS7anAgms5YtRhx/LfCOR8mHI/WtY99HeL1r7keB8qhbYwpq98stvfNGLa67xJazxHvEDnqobPJG9iPQ+iC7yVxfHR8ol+Fboda9qP2Vp7XK8NpAyhInbBlOfhX1YjOPnXRmyd3HUZxjqdCS3uYdJvIdRsWzoupSATJ07tOTjdjyyeTDyNYRmsclOPll9maNOSp8o9aOldpiTQBQBQBQBQBQBQEGgPOaCv2nreoa1J4o0Y2dp6BEPjYfmb+1c2LxzeT5I0nslEeX1nb39rJbXcSywyDDIw61vKKkqZRNrdHlpoZNWuv/wA7b3U7abYqBqFw75eXPNYd3t8R64x61zNan3aey5NF4VqfLOr69vHsYU7O2sHcwoktminVd6r8SmMgeHy5GoySmofhoRSvxGOxthdyNHpkiy2bLHO/EcjgjBIi3D8xPLpXD3feNrG7XPt8DXVp3Y/uLGTbbNbRWyyRorAK55kc8D1HzPrW2bs8vC8aSa/z5mcZpXbFSvNFJEbAmWXJluQJBHw0VjiPLdBk86wwuSru93y/gvT6mkkt9RovIJdRkFzacK11+1jEgWN9yujE7Uc4wVbB9q7pRc3qW016GSdbPg26KtlqzJrW1zckcMpK2e7MOTKo8jnqeprXFoyfidf2KzuPhN97p1td6fPZSRqIZ1YOFGOZ8/fPOtJ44yi4vhlVJp2Yuyl5Nc6WIbs5u7ORracnzZfP6jBqnZ5uUKlyti2RU9uo6rcoFAFAFAFAFAFAYdbuu46ReXY6wwO49wOVZ5ZaYNkxVsp7M2fcdA0+3+8sClz6sRlj+pNRhjpxpEzdyZo1a9XTtMurx/hgiaQj1wKtOWmLZCVujzFvEbDsva6fLbPdX2qI8lxHHOsUjs43OwJPlkCsEtONR6s0buV+gpuVutM0OwsdUshBcwuFs9QgYNwwTlt2Oe7bnIGQ1cuW4Y1GS36NGipybTN9hJbNb2qae8dvC1s0dwzneFUvgMcffPz6ZrHVGkoOlTv/AD1ZLvmQzVolSOSykmEph8Cztu3BuWB6Hl7VWTiqeNu669f7kK+JCzVJrBLi3JR5YtsYnhQ5M4xy3D1DY5E86pKWJSi1utr+Pv8AMvFSplub+01d9cvtMWKBYQiql0qiGMZyZM9Tg8sdOYrvWuOTvJRrb149zJ6XHSmM7TFh2tuIE5W+pQd5QDpxFwrfqNp+lbR8OZrpJWUe8L9D0RrqMzz9gO69sdRgHJLu2juQP6gSjfttrmh4c8l6qzR7wTPQV0mYUAUAUAUAUAUAj7bn/Kmpf9nH7iuftX5Mi+PzIcQ4EMYHTaP7VtHhFXyIu3x/ylqA8iEB9i6g/tWXaPy2Wx+ZCnt2ZO/aPFZ9476CXshEVKGRSvxqee3B+IHl0PWsu0J3HTz0L4+HfBgRVs0F1xzaXWm3fEl0uSVeGSR4miJ54ZWJAzjyrGT0rVdOL4LLfbo+oyh/xG2tpoFiW7u4Zn4kBAyAeUbAcvhIyfIisZrvYpxq2nx+xKel/BG+SSC4jgltVZEgtd0m04O3yT9jVMkoZFGWP9Md/wCAk42n1Zl1R0eUaSj21rFNw3MgKjhAcyDnqcgYq05LUsEaSdP2Cutb3EmsKeDc3Cd8n0wTgXV8GUzTOmdu3I2rGG5Zx55qcm6bVuPV9f8AomPNdT0l4WOtdmHPxsJg3i3cuFk8/PmBzrtk/wATG/8AODJeWR6bNdZkIJ+Xbmzx56fLn/Wtcz/+hezNF+W/cf10mYUAUAUAUAUAUAs7TWzXnZ/ULdBlnt3Cj545VlnjqxyRaDqSYsn1K5l0LRrmxuVgW7aFJJmjDlQ64GAeWd2B9az1yeOLT5otS1NMUmw1a90+4tr24vLhry0uIX4qgLHNG/gIAAADCs9M5Rabu0/qWtJo2XV9d3/ZfTdX069FnIqr3iRow+1cYkBXBJII6DHOrSlKWNTi6ISSk0xTp+nd97P6fqFpbJcahJcmSa+u2yCELc2LcwrYAwBgZrB49WNSSt3yy7lUmmbYwt/e3EujrBZyxRkOI35zcvFsAGMZGNw9Kwku8m5Ytmvv7FrpJS3NGnZujcLaPwFYs7s55BCOh/euTBeVyWN16+xefhpyOZ0S+tYoLSxt5OBKrTx7svMAw+HPUEc+fpiujGo5YKGOK2e/q/Ypbi7bMs0M9v2juNK0a7NlC/CLW20srBsl2TIIQ48uh510OLjmePG6W2xW04apbjPVDcXPaJ109Q0umafIU9OLJyUfov710Tbll8P6V9ykaUN+pXDearx7ErJcxRNJHBHb3EQ4k6gfxZHPVceXTp8xVVLLcXe3H8smo7m6D/iO29w45raWCRk+jO5b+yitV4u0P4IrxjPQV0mYUAUAUAUAUAUBBGRigPN9lQtsb7Q5wCbGcvEGHWFyWQj2OR9K5cG1430NJ71IjUtbu5ZrSHSODG8s88Ra5jLZeIE7AARjdg8/QdKvLI20ohQXUw6ZdfY92ovIXg0rWcTRiVSvdbhxlom9NxJI+eazg9L34f2Ja1LblGmfsvcGZY47lJdPhjPd7CUARI4+AEKOajmefU0l2dt87enQhZFXxGWh6XJpto8FxwZCju0UiJtOG5kY8uZPL0qcOF44NS35E5ansLuyKhzOrKCpjGQfc15f/iknOafob9oeyNN3oU13czyu0K8TJjZQQ8JAARlb6cxXa+ySlOUm1v8AVehksqSSK229nrI3uozte6k6iKPCjfKx58NcDmN2eZ6A1r+RHVN3IjzulsjnSpotCXbrJaO6vm4892y/weIeWzd5YGAM0xtYlU+X1Elr8vCG8GpwTTXgUYhtMB58+AnGSB7DGfet1li7fRGemqF/ZBHmtbjVZlIk1KczgHyjxtQf6QD9az7Om05vqXyc6fQ9BXSZhQBQBQBQBQBQBQHne0tvNZ3Nvr9lG0ktopS5iXrNATzx6leo+tc+ZOLWSPQ0g7Wlmi3stHmkTtBAodmQyrKjMVPhwWC9N23lnGfKrKMPzEVbl5RRe3N1q9/NaBLe606WKKSO1dMd5t35NIrkjDKT09vXNZyk5yaW6LKoqzRbnVdAkNqhbVrBACoDjvUC+WQcbx8+tLnidLdfdDwyV8M1z61BfWxisLyGCduRW6BjZfofOs8vaIzhphJJ/HYmMGn4kY9JtpdNl4pu7MKRhhxc5Fef2bFPs89WuNe5tkkpqqYyudaZgU0y2e7l/F8ES/MsfL2zXpPtWrbEr/YwWPrJ0LL2xvLG1n1y6mhutTiUFSyEw28eRu2KOfTz6nFVlCcIvLJ3L7IlSTelcGzTNZGpO9pdWLEFjGZol4tvIQOYDY/uMeWa1x5u82a/giUNO9mLUbe3uZY+zGkxLDbfzL4xchHGTnZ+Zj+2apNJvuYbLqSn+uR6qNFjRURQqqAAB5CutKkZHVSAoAoAoAoAoAoAoCCMjFAeVuLe57LXUt1YQvcaNMxe4tIxlrZj1eMea+q/UVzOLxPVHg0VTVPk36FY6L/1PR9rpKm1HSQsqKTkqgJwvPqBjpV8cYeaJEnLhiDSYTqmrzz3ghW7mlLNGXeC6tEXkoX8SkAEjkMk9a54x1zbfP3Rduoj+/uQmrRwTQxS2ixLxWdAxQsSFPty5+9Tlmo5FGSuNbkRXh2e5faW8c9pvggtoXLsAVhBGASKjHijOFxST9iJSadNnWnIbmyk71IZd5aN0IAUYJUgACr9mTlj8T+H/BE9nsVaLFMthPpt9GzLbsYFdxkSxY8Jz5+E4PzBq+FPS4S6bCT3tC5r5rSCHs/2fIur2GMRvOw8Fuv4nI5bvRfOs9eld1i3f7E6b8cuBzoulRaVamJGaWWRi80782lc9WP/AK8q3x41BfErKWpjCtSoUAUAUAUAUAUAUAUAUAUB5687NcO6e+0K6bTbxzmQIu6GY/1p0z8xg1g8NPVB0y6n0lucR6rqdnIPtvRWYoMC6sP4qY/L8S/vVXllDzx+hOlPhl8eq6JcTTSG5AeZBG6TBk5DPLBHzNZvN2dtuT59dhomuDVaXmm2lrHDFdxsiDAO/Jpjz9nxQUVLgOM5O2jO2q28IddPs7q6dmLbYoyASf6mwBUR7TjW2JN/Il43+ooey1vVztvrhdNtD1gtW3SuPQv0H0H1q+jNk870r0XP1FxjxuONO0+1022W2soUhiBztUdT6n1PzrohCMFpijNtvdkalLNb2plg4e4EAhwcYJx5e9JtpWgjBFq8jXq2jxR8TvBjYqfuAHxe+4YxWfevVponTtY5HStypNAFAFAFAFAFAFAFAFAFARigIeNH+NFb3GahxT5RNs5WGJfhiQeyiq93D0QtneB6VeiCcUAUBDKGGGAI9DQHPCjznYueucVFIHdSAoAoAoCDQFFpdxXYlMJJEUjRNkY8Q61WM1K6Jao0VYgioBNSCm6uFtreSd1dljXcRGhdj7AczVW6VhFqncAfWrAmgCgIzQFNrdxXSs0LbgrFTyxzrLHljkVxJcXHkurQgM1IJoCM0AZoCi0vIbsSmEk8KVonyMeJetVjJS4Jaoz6rqDWQjWOMO7565wACBnl16jlVMk9PAirLtOu++WwlKbGzgrnODVoS1Kw1RpNXIEGiX9pb/aEc91BG/fpTteQA9a5cM4q031ZeSewvvr9IdK1yN7rbMLxgimTxAHbjHnjrWUsiUZq97LKO6OdSm2668IuZxpTTR99ZX8Mcx+FA2chW8O4D5epqZN95V7bX7hLw/E4vtRWHR9aie72XI1BlReJ4wCy4AHXGP2qXOoSV72Et0V6jEGt+1V+09xx7Z3jgxO4WIGFCcKDjqalq9cvT+ESv0o6vGtpn1uXU76WC4tQO67bhkMScMFWVQcMS2fI5Ix8qNpuTb36EelGm11B4jqh1G44M7WEEmx224Yo2do/N6VPeVqt70g48E7i0UMrzLLssomMbTtE8fhzuXyYn5+lYT4Tu9l1r6epK5ofXk57gpiyJJwEjDdctW+bI+58PL4+ZSK8W4u4bw3otp0WG3vYeCpjlJ8ajkc4GDtz+lYwUoT0tUpKvmi20la5QplubzUNOvtzyCXTdOmhl2EjdcEEE8vQLkfnFNc5wf8AtX3J0pNfE1X+oRz3VstrdCT/AAu4duHJnyXBOPPrWksltJPowls79TiNU0bTdM1njTtHsU3rSTM+5XQeLBPLDBemOWahfhQjk+pHmbRmnS+4mmW96yEXUUtxIlxdPCplJB2blBPhU8l6cj6VWWu4qXW3yStO7R1aObj7OttRvA9g8lwFdJ32uykbEMhALYG/32+dIu9Km9t+odb0U28tv3RbWGSS4jn1Kfh7roxpIFGfHJzYj264qE46aXq+pLT6+g17LIl5bXkMzLIlveMIdk7Pw/CpwrnDYyT/APK27OtSafqUntTR6OCGO3iWKFAiKMACupRS4Mzs1IKGsrRmLNawFickmMZNZ93B8om2dPa27ycR4Imkxt3lATj0zU6Y3dC2SYISjIYkKPksu0Yb39anSvQizlrS2eXivbwtJjbvKAnHpmjiuaJtnZhiIcGJMSc3G0eL39aUiDiS1tpZEklt4nkj+BmQEr7Hyo0n0JtkyW0EkiySQxu6fCzICV9jRxT3aFsGt4H274Y22fDlAdvtUOEXyhbLCoJBIBI6cqtSIKr0AWzvgbkUspIzg461WfFkow9nogunLMzM8tyxmldsZZj7ewH0rPAvBfqWnybo7S2iBEVtCgOchYwM56/rWijFcIrbLGijMfDMamPGNpHLHtVmlVEHM0ENwhjnijlQnO11DD9DUOKfKJuiJLaCSHgyQRPF+BkBX9KaVVULZD2ltJGYpLeFoyclGQEZ9cVGmPFC2WRxRx54aKueu0YzyxVkkuCDupB//9k=)
0 comments