
One of my first memories related to baking was a demonstration conducted at my kindergarten where bread dough was shaped into turtles, and birds, and elaborate braids. Scissors were used to create the tiny bread spikes on the backs of alligator and hedgehog-shaped loaves. Lobster claws got a snip up the center for visual effect and each figure was placed in an oven until puffy, golden, and fragrant. We were each allowed to take one home. The whole experience blew my five year-old mind. 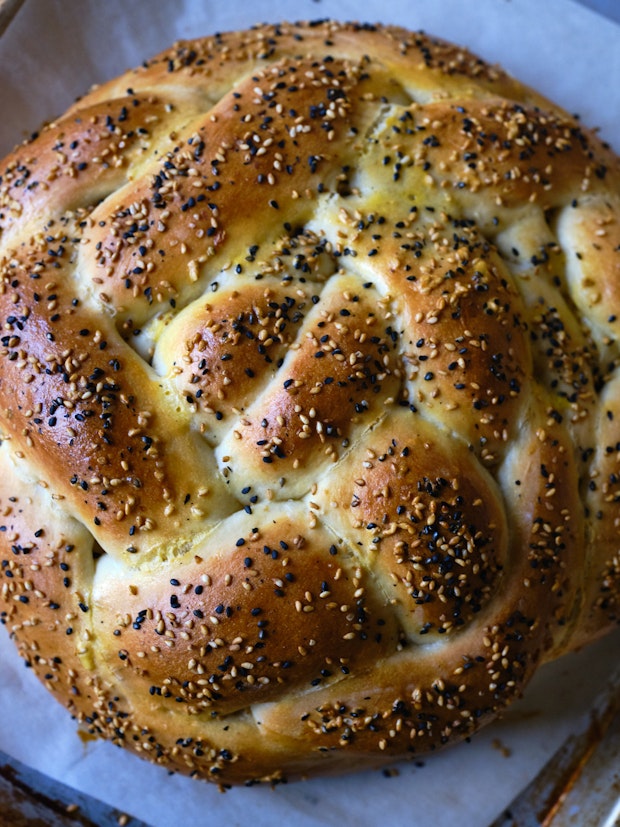
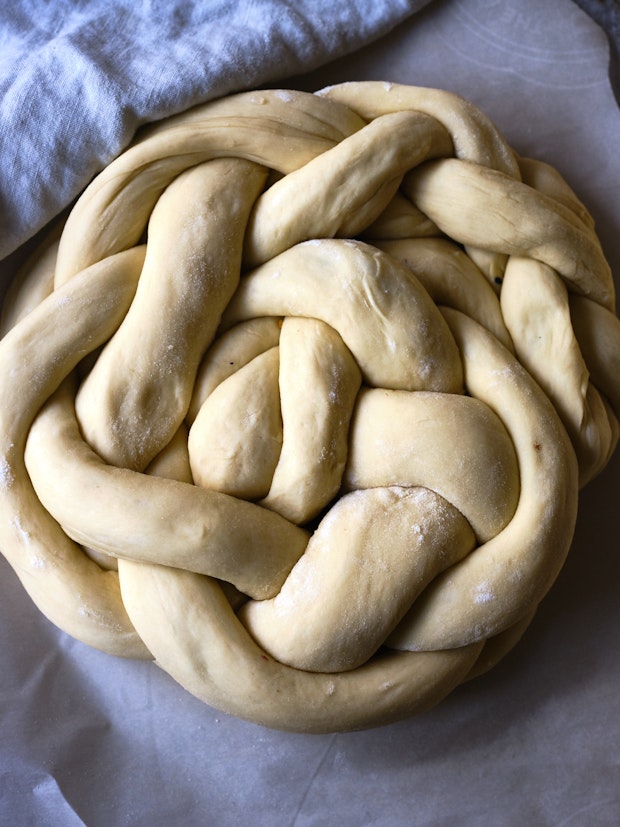
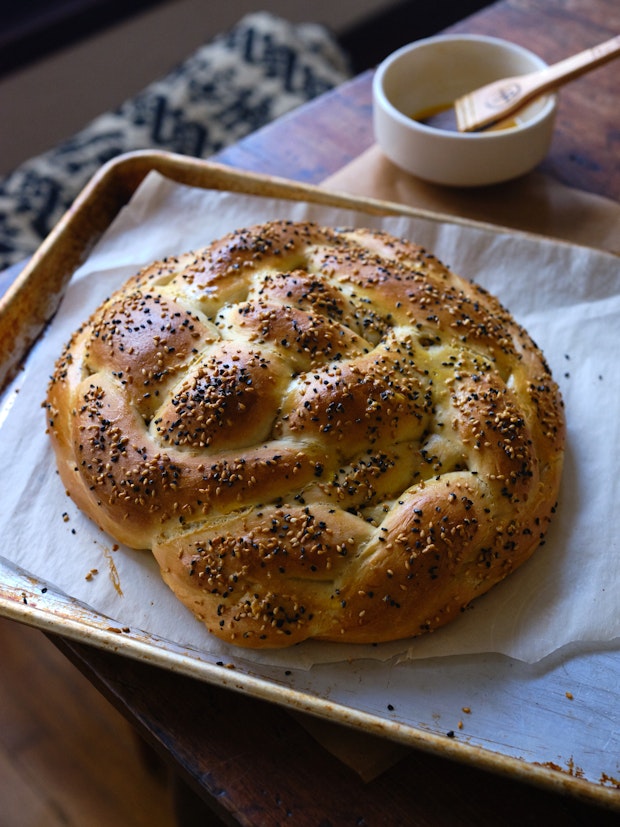
I still like to bake elaborate braided loaves. Especially when things in my life are tumultuous. I made this one a couple of times prior to the holidays, and decided to make it again last week to photograph and share with you. It’s made with a rich, buttery, yeast-based dough. Each of the four strands in the braid is stuffed with a caramelized onion and grated cheese mixture. If you’ve never baked a braided loaf before, I’ll admit that stuffing the strands adds a layer of complexity, but the whole process is incredibly forgiving if you commit and keep going. If you look at the shape below and think “no way” just remember it’s a simple braid coiled into a snail shape.
The (Stuffed) Braided Bread Process
To make this bread you start by making beautiful yeast dough. You roll your dough into a rectangle, cut that rectangle into four strips, and then stuff each strand with awesomeness. I usually prepare the stuffing a day ahead of time, or the morning of the day I plan on baking. This gives the filling some time to cool. I’ve locked onto this onion-cheese combo lately, but you can imagine endless variations.
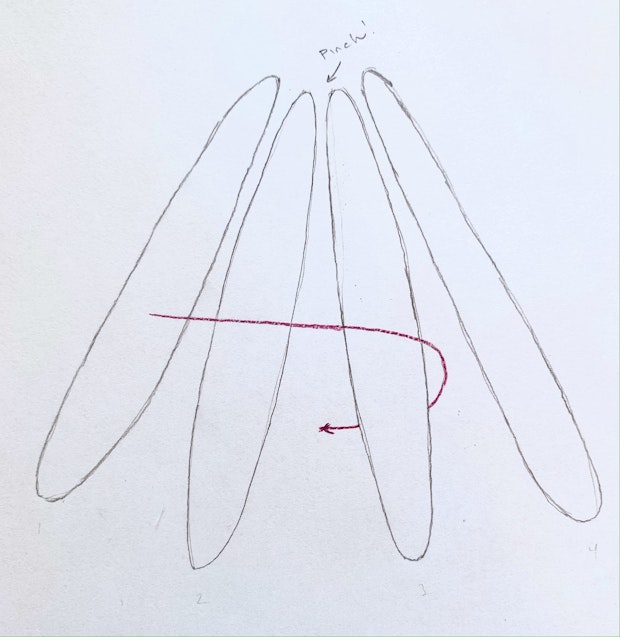
To fill the dough, you run the filling in a line up the middle of each of the four strips of dough. Fold them each in half, and then pinch the seam to seal the filling in. Now you have four filled strands that you’ll arrange side-by-side (below). Pinch them together at the top and start braiding (see diagram below). Coil the braid into a tight round, snail shape, let the dough rise, brush with an egg wash, and bake!
A Four-strand Braid
First, let me say – if you’re worried about trying the four-strand braid, I understand! If you want to fall back to a chubby three-strand bread braid the first time through, go for it. The main thing is to commit to the braid either way. Even if you’re convinced things aren’t going well. This feeling can be triggered by a few things. A common problem is strands splitting open to reveal the filling – just re-pinch and keep going. Or, you might feel like your strands keep stretching and getting longer and longer? It’s ok, you will coil them into a round shape. Keep braiding even if your strands are longer than your sheet pan. Boss the dough around a bit. If it’s too sticky, dust with a bit of flour. The main thing? Don’t get discouraged, keep going.
Please let me know if you bake a braided loaf, or send me a message on Insta. Or if you experiment with other fillings, please leave a comment. I can’t wait to see what you do with this one. I loved seeing all of you posting soup pics last week. xo – h
Continue reading Braided Onion Bread on 101 Cookbooks


![Forest Essentials [CPV] WW](data:image/jpeg;base64,/9j/4AAQSkZJRgABAQAAAQABAAD/2wCEAAkGBwgHBgkIBwgKCgkLDRYPDQwMDRsUFRAWIB0iIiAdHx8kKDQsJCYxJx8fLT0tMTU3Ojo6Iys/RD84QzQ5OjcBCgoKDQwNGg8PGjclHyU3Nzc3Nzc3Nzc3Nzc3Nzc3Nzc3Nzc3Nzc3Nzc3Nzc3Nzc3Nzc3Nzc3Nzc3Nzc3Nzc3N//AABEIAHQAlwMBEQACEQEDEQH/xAAbAAACAwEBAQAAAAAAAAAAAAAABQEDBAIGB//EAD0QAAIBAwIDBgMGBAQHAQAAAAECAwAEEQUSEyExBhQiQVFxMmGBFUJScpGhIzNisSUmksEkNDVzotHxFv/EABkBAQADAQEAAAAAAAAAAAAAAAABAgMEBf/EADURAAICAQMBBgQFAwQDAAAAAAABAhEDEiExQQQTIjJRcWGBkaEjM0Kx0VLh8FNiwfEFFDT/2gAMAwEAAhEDEQA/APuNAFAFAFAFAFALNX13T9ICi7m/jSfy4IwXlk/Ko5ms55Iw5LRg5cC+K87Ral4rawh0yA9HvTvlPz2KcD6mstWaflVe5aoLl2dPG0EmzUe0bCXrsThxftzNYzVOp5a+iJT9IjBdPfblNRu/csD/ALVf/wBeVWsj+xGtf0mZhqq5awvrS7A+5MuP/JT/ALVWKzryTUvf+xL09VRXF2jS3mWDWrWXTpGOFkkO6F/aQch9cVpHtFOsi0/sQ8f9O49VgwBU5B6EV1cmZNAFAFAFAFAFAFAFAFAFAFAee1fWLqe+bR9ACvegA3Fw4zHaKfM+rei/rXPkySctGPn9i8YpLVLgzvYwdmrPvUCG81S6mSHvV0xLO7nAJP3VHoPSolFYlq5ZNuTNlpdalaarDY6pJbXC3MbNFLBGYyrLjKlSTy58jUxlOM1GfUrSatEX1teNqt21mEUS2y5Z48hiCwwD5HBrHNjyPJLR1ReMo6VYxTMOljhxSBkhwqNzYEDpWzuGDwrhFOZGDSIIOOv/AC7SRIMERFJB756+dc/ZIx24tfCmXyNk63qSQzCxbTmvRJA0siZX4BgHAPxHn0rozZEnocbKxj1uheIbns/Et5pAlutIYb5LJsl4VP3o888D8J+lZpPD4obx9P4LWp7S5PR2N5Bf2sd1ayrJDIu5GXzFdUJqauJm006ZoqxAUAUAUAUAUAUAUAUAl7S6nPaQxWWnBW1K9bh2wbmE/E5+Sjn+lY5cjjUVyy0Ve74FF08PZi3stNgnNstw7SXOpTDO4jm3PzkbHIHoPbFZOsSUV82X87bHjRQ67o+NQtZIYpxu4ch2unPKty+FuQPqK2pTh4im8WILCZ5r5zoAn1KVBwm1O/kzFEM81TA8R6Zx9TXPctX4e79XwXdV4thmLdt4XUdcmklyoMcGI1BbpyGTg48zUSh/qZH8thdcRLYY7JtwhvboMknD/msfFWSjhd6ZvZ1z1JbkuUS7anAgms5YtRhx/LfCOR8mHI/WtY99HeL1r7keB8qhbYwpq98stvfNGLa67xJazxHvEDnqobPJG9iPQ+iC7yVxfHR8ol+Fboda9qP2Vp7XK8NpAyhInbBlOfhX1YjOPnXRmyd3HUZxjqdCS3uYdJvIdRsWzoupSATJ07tOTjdjyyeTDyNYRmsclOPll9maNOSp8o9aOldpiTQBQBQBQBQBQBQEGgPOaCv2nreoa1J4o0Y2dp6BEPjYfmb+1c2LxzeT5I0nslEeX1nb39rJbXcSywyDDIw61vKKkqZRNrdHlpoZNWuv/wA7b3U7abYqBqFw75eXPNYd3t8R64x61zNan3aey5NF4VqfLOr69vHsYU7O2sHcwoktminVd6r8SmMgeHy5GoySmofhoRSvxGOxthdyNHpkiy2bLHO/EcjgjBIi3D8xPLpXD3feNrG7XPt8DXVp3Y/uLGTbbNbRWyyRorAK55kc8D1HzPrW2bs8vC8aSa/z5mcZpXbFSvNFJEbAmWXJluQJBHw0VjiPLdBk86wwuSru93y/gvT6mkkt9RovIJdRkFzacK11+1jEgWN9yujE7Uc4wVbB9q7pRc3qW016GSdbPg26KtlqzJrW1zckcMpK2e7MOTKo8jnqeprXFoyfidf2KzuPhN97p1td6fPZSRqIZ1YOFGOZ8/fPOtJ44yi4vhlVJp2Yuyl5Nc6WIbs5u7ORracnzZfP6jBqnZ5uUKlyti2RU9uo6rcoFAFAFAFAFAFAYdbuu46ReXY6wwO49wOVZ5ZaYNkxVsp7M2fcdA0+3+8sClz6sRlj+pNRhjpxpEzdyZo1a9XTtMurx/hgiaQj1wKtOWmLZCVujzFvEbDsva6fLbPdX2qI8lxHHOsUjs43OwJPlkCsEtONR6s0buV+gpuVutM0OwsdUshBcwuFs9QgYNwwTlt2Oe7bnIGQ1cuW4Y1GS36NGipybTN9hJbNb2qae8dvC1s0dwzneFUvgMcffPz6ZrHVGkoOlTv/AD1ZLvmQzVolSOSykmEph8Cztu3BuWB6Hl7VWTiqeNu669f7kK+JCzVJrBLi3JR5YtsYnhQ5M4xy3D1DY5E86pKWJSi1utr+Pv8AMvFSplub+01d9cvtMWKBYQiql0qiGMZyZM9Tg8sdOYrvWuOTvJRrb149zJ6XHSmM7TFh2tuIE5W+pQd5QDpxFwrfqNp+lbR8OZrpJWUe8L9D0RrqMzz9gO69sdRgHJLu2juQP6gSjfttrmh4c8l6qzR7wTPQV0mYUAUAUAUAUAUAj7bn/Kmpf9nH7iuftX5Mi+PzIcQ4EMYHTaP7VtHhFXyIu3x/ylqA8iEB9i6g/tWXaPy2Wx+ZCnt2ZO/aPFZ9476CXshEVKGRSvxqee3B+IHl0PWsu0J3HTz0L4+HfBgRVs0F1xzaXWm3fEl0uSVeGSR4miJ54ZWJAzjyrGT0rVdOL4LLfbo+oyh/xG2tpoFiW7u4Zn4kBAyAeUbAcvhIyfIisZrvYpxq2nx+xKel/BG+SSC4jgltVZEgtd0m04O3yT9jVMkoZFGWP9Md/wCAk42n1Zl1R0eUaSj21rFNw3MgKjhAcyDnqcgYq05LUsEaSdP2Cutb3EmsKeDc3Cd8n0wTgXV8GUzTOmdu3I2rGG5Zx55qcm6bVuPV9f8AomPNdT0l4WOtdmHPxsJg3i3cuFk8/PmBzrtk/wATG/8AODJeWR6bNdZkIJ+Xbmzx56fLn/Wtcz/+hezNF+W/cf10mYUAUAUAUAUAUAs7TWzXnZ/ULdBlnt3Cj545VlnjqxyRaDqSYsn1K5l0LRrmxuVgW7aFJJmjDlQ64GAeWd2B9az1yeOLT5otS1NMUmw1a90+4tr24vLhry0uIX4qgLHNG/gIAAADCs9M5Rabu0/qWtJo2XV9d3/ZfTdX069FnIqr3iRow+1cYkBXBJII6DHOrSlKWNTi6ISSk0xTp+nd97P6fqFpbJcahJcmSa+u2yCELc2LcwrYAwBgZrB49WNSSt3yy7lUmmbYwt/e3EujrBZyxRkOI35zcvFsAGMZGNw9Kwku8m5Ytmvv7FrpJS3NGnZujcLaPwFYs7s55BCOh/euTBeVyWN16+xefhpyOZ0S+tYoLSxt5OBKrTx7svMAw+HPUEc+fpiujGo5YKGOK2e/q/Ypbi7bMs0M9v2juNK0a7NlC/CLW20srBsl2TIIQ48uh510OLjmePG6W2xW04apbjPVDcXPaJ109Q0umafIU9OLJyUfov710Tbll8P6V9ykaUN+pXDearx7ErJcxRNJHBHb3EQ4k6gfxZHPVceXTp8xVVLLcXe3H8smo7m6D/iO29w45raWCRk+jO5b+yitV4u0P4IrxjPQV0mYUAUAUAUAUAUBBGRigPN9lQtsb7Q5wCbGcvEGHWFyWQj2OR9K5cG1430NJ71IjUtbu5ZrSHSODG8s88Ra5jLZeIE7AARjdg8/QdKvLI20ohQXUw6ZdfY92ovIXg0rWcTRiVSvdbhxlom9NxJI+eazg9L34f2Ja1LblGmfsvcGZY47lJdPhjPd7CUARI4+AEKOajmefU0l2dt87enQhZFXxGWh6XJpto8FxwZCju0UiJtOG5kY8uZPL0qcOF44NS35E5ansLuyKhzOrKCpjGQfc15f/iknOafob9oeyNN3oU13czyu0K8TJjZQQ8JAARlb6cxXa+ySlOUm1v8AVehksqSSK229nrI3uozte6k6iKPCjfKx58NcDmN2eZ6A1r+RHVN3IjzulsjnSpotCXbrJaO6vm4892y/weIeWzd5YGAM0xtYlU+X1Elr8vCG8GpwTTXgUYhtMB58+AnGSB7DGfet1li7fRGemqF/ZBHmtbjVZlIk1KczgHyjxtQf6QD9az7Om05vqXyc6fQ9BXSZhQBQBQBQBQBQBQHne0tvNZ3Nvr9lG0ktopS5iXrNATzx6leo+tc+ZOLWSPQ0g7Wlmi3stHmkTtBAodmQyrKjMVPhwWC9N23lnGfKrKMPzEVbl5RRe3N1q9/NaBLe606WKKSO1dMd5t35NIrkjDKT09vXNZyk5yaW6LKoqzRbnVdAkNqhbVrBACoDjvUC+WQcbx8+tLnidLdfdDwyV8M1z61BfWxisLyGCduRW6BjZfofOs8vaIzhphJJ/HYmMGn4kY9JtpdNl4pu7MKRhhxc5Fef2bFPs89WuNe5tkkpqqYyudaZgU0y2e7l/F8ES/MsfL2zXpPtWrbEr/YwWPrJ0LL2xvLG1n1y6mhutTiUFSyEw28eRu2KOfTz6nFVlCcIvLJ3L7IlSTelcGzTNZGpO9pdWLEFjGZol4tvIQOYDY/uMeWa1x5u82a/giUNO9mLUbe3uZY+zGkxLDbfzL4xchHGTnZ+Zj+2apNJvuYbLqSn+uR6qNFjRURQqqAAB5CutKkZHVSAoAoAoAoAoAoAoCCMjFAeVuLe57LXUt1YQvcaNMxe4tIxlrZj1eMea+q/UVzOLxPVHg0VTVPk36FY6L/1PR9rpKm1HSQsqKTkqgJwvPqBjpV8cYeaJEnLhiDSYTqmrzz3ghW7mlLNGXeC6tEXkoX8SkAEjkMk9a54x1zbfP3Rduoj+/uQmrRwTQxS2ixLxWdAxQsSFPty5+9Tlmo5FGSuNbkRXh2e5faW8c9pvggtoXLsAVhBGASKjHijOFxST9iJSadNnWnIbmyk71IZd5aN0IAUYJUgACr9mTlj8T+H/BE9nsVaLFMthPpt9GzLbsYFdxkSxY8Jz5+E4PzBq+FPS4S6bCT3tC5r5rSCHs/2fIur2GMRvOw8Fuv4nI5bvRfOs9eld1i3f7E6b8cuBzoulRaVamJGaWWRi80782lc9WP/AK8q3x41BfErKWpjCtSoUAUAUAUAUAUAUAUAUAUB5687NcO6e+0K6bTbxzmQIu6GY/1p0z8xg1g8NPVB0y6n0lucR6rqdnIPtvRWYoMC6sP4qY/L8S/vVXllDzx+hOlPhl8eq6JcTTSG5AeZBG6TBk5DPLBHzNZvN2dtuT59dhomuDVaXmm2lrHDFdxsiDAO/Jpjz9nxQUVLgOM5O2jO2q28IddPs7q6dmLbYoyASf6mwBUR7TjW2JN/Il43+ooey1vVztvrhdNtD1gtW3SuPQv0H0H1q+jNk870r0XP1FxjxuONO0+1022W2soUhiBztUdT6n1PzrohCMFpijNtvdkalLNb2plg4e4EAhwcYJx5e9JtpWgjBFq8jXq2jxR8TvBjYqfuAHxe+4YxWfevVponTtY5HStypNAFAFAFAFAFAFAFAFAFARigIeNH+NFb3GahxT5RNs5WGJfhiQeyiq93D0QtneB6VeiCcUAUBDKGGGAI9DQHPCjznYueucVFIHdSAoAoAoCDQFFpdxXYlMJJEUjRNkY8Q61WM1K6Jao0VYgioBNSCm6uFtreSd1dljXcRGhdj7AczVW6VhFqncAfWrAmgCgIzQFNrdxXSs0LbgrFTyxzrLHljkVxJcXHkurQgM1IJoCM0AZoCi0vIbsSmEk8KVonyMeJetVjJS4Jaoz6rqDWQjWOMO7565wACBnl16jlVMk9PAirLtOu++WwlKbGzgrnODVoS1Kw1RpNXIEGiX9pb/aEc91BG/fpTteQA9a5cM4q031ZeSewvvr9IdK1yN7rbMLxgimTxAHbjHnjrWUsiUZq97LKO6OdSm2668IuZxpTTR99ZX8Mcx+FA2chW8O4D5epqZN95V7bX7hLw/E4vtRWHR9aie72XI1BlReJ4wCy4AHXGP2qXOoSV72Et0V6jEGt+1V+09xx7Z3jgxO4WIGFCcKDjqalq9cvT+ESv0o6vGtpn1uXU76WC4tQO67bhkMScMFWVQcMS2fI5Ix8qNpuTb36EelGm11B4jqh1G44M7WEEmx224Yo2do/N6VPeVqt70g48E7i0UMrzLLssomMbTtE8fhzuXyYn5+lYT4Tu9l1r6epK5ofXk57gpiyJJwEjDdctW+bI+58PL4+ZSK8W4u4bw3otp0WG3vYeCpjlJ8ajkc4GDtz+lYwUoT0tUpKvmi20la5QplubzUNOvtzyCXTdOmhl2EjdcEEE8vQLkfnFNc5wf8AtX3J0pNfE1X+oRz3VstrdCT/AAu4duHJnyXBOPPrWksltJPowls79TiNU0bTdM1njTtHsU3rSTM+5XQeLBPLDBemOWahfhQjk+pHmbRmnS+4mmW96yEXUUtxIlxdPCplJB2blBPhU8l6cj6VWWu4qXW3yStO7R1aObj7OttRvA9g8lwFdJ32uykbEMhALYG/32+dIu9Km9t+odb0U28tv3RbWGSS4jn1Kfh7roxpIFGfHJzYj264qE46aXq+pLT6+g17LIl5bXkMzLIlveMIdk7Pw/CpwrnDYyT/APK27OtSafqUntTR6OCGO3iWKFAiKMACupRS4Mzs1IKGsrRmLNawFickmMZNZ93B8om2dPa27ycR4Imkxt3lATj0zU6Y3dC2SYISjIYkKPksu0Yb39anSvQizlrS2eXivbwtJjbvKAnHpmjiuaJtnZhiIcGJMSc3G0eL39aUiDiS1tpZEklt4nkj+BmQEr7Hyo0n0JtkyW0EkiySQxu6fCzICV9jRxT3aFsGt4H274Y22fDlAdvtUOEXyhbLCoJBIBI6cqtSIKr0AWzvgbkUspIzg461WfFkow9nogunLMzM8tyxmldsZZj7ewH0rPAvBfqWnybo7S2iBEVtCgOchYwM56/rWijFcIrbLGijMfDMamPGNpHLHtVmlVEHM0ENwhjnijlQnO11DD9DUOKfKJuiJLaCSHgyQRPF+BkBX9KaVVULZD2ltJGYpLeFoyclGQEZ9cVGmPFC2WRxRx54aKueu0YzyxVkkuCDupB//9k=)
0 comments