

Summertime is pepper time, and with all this spicy bounty it’s the perfect time to whip up some homemade fermented hot sauce. It’s incredible easy to make—don’t let yourself be scared by the fact that you have to let some things sit in a jar for a a few days at room temperature to make it happen. This fermentation process is super simple, and just involves combining chopped peppers with some crushed garlic and salt water in a jar. There’s some equipment you’ll need to do it properly, and I have it outlined in the paragraph below as well as in the recipe box, but it’s very inexpensive and some of it you might already have in your kitchen (a wide mouth mason jar, to be exact).

The Fermentation Process
For fermented hot sauce, this type of fermentation process is called lacto fermentation, because we’re encouraging the growth of food-preserving and beneficial lactic acid bacteria. All fruits and vegetables have lactic acid bacteria on their exterior. It’s a naturally occurring bacteria that exists all over the world, just like yeast. Lactic acid bacteria thrive in environments where dangerous bacteria don’t, basically low-oxygen and salt-rich environments. So, by submerging the vegetables under a brine solution (aka salty water), you’re providing the perfect habitat for that lactic acid bacteria to take off and grow. As they reproduce, they excrete lactic acid, hence their name. Lactic acid is sour and tart—since it’s an acid, and it tastes kind of like vinegar, but with a more complex flavor and the added bonus of probiotics.
In addition to releasing lactic acid, the lactic acid bacteria also excrete carbon dioxide as they ferment, which is why you need an air lock on top of your fermentation vessel to let the air out. If you don’t, the increasing pressure inside the fermentation vessel could cause the jar to break. I’ll talk more about air locks below under ‘equipment’, as well as what a healthy fermentation looks like.
Remember how dangerous bacteria don’t like being away from oxygen? Well, it’s precisely this reason that you need a weight on top of your veggies to keep them submerged underneath the brine, so that way any bad bacteria suffocates and dies immediately. The best way to limit any bad bacteria is to have clean equipment in the first place, so make sure to wash the jars, lids, weight, and air lock very well, as well as the knife and cutting board you use to cut the veggies. I like to boil or steam any glass equipment like the jars and the weights for 5 minutes beforehand.
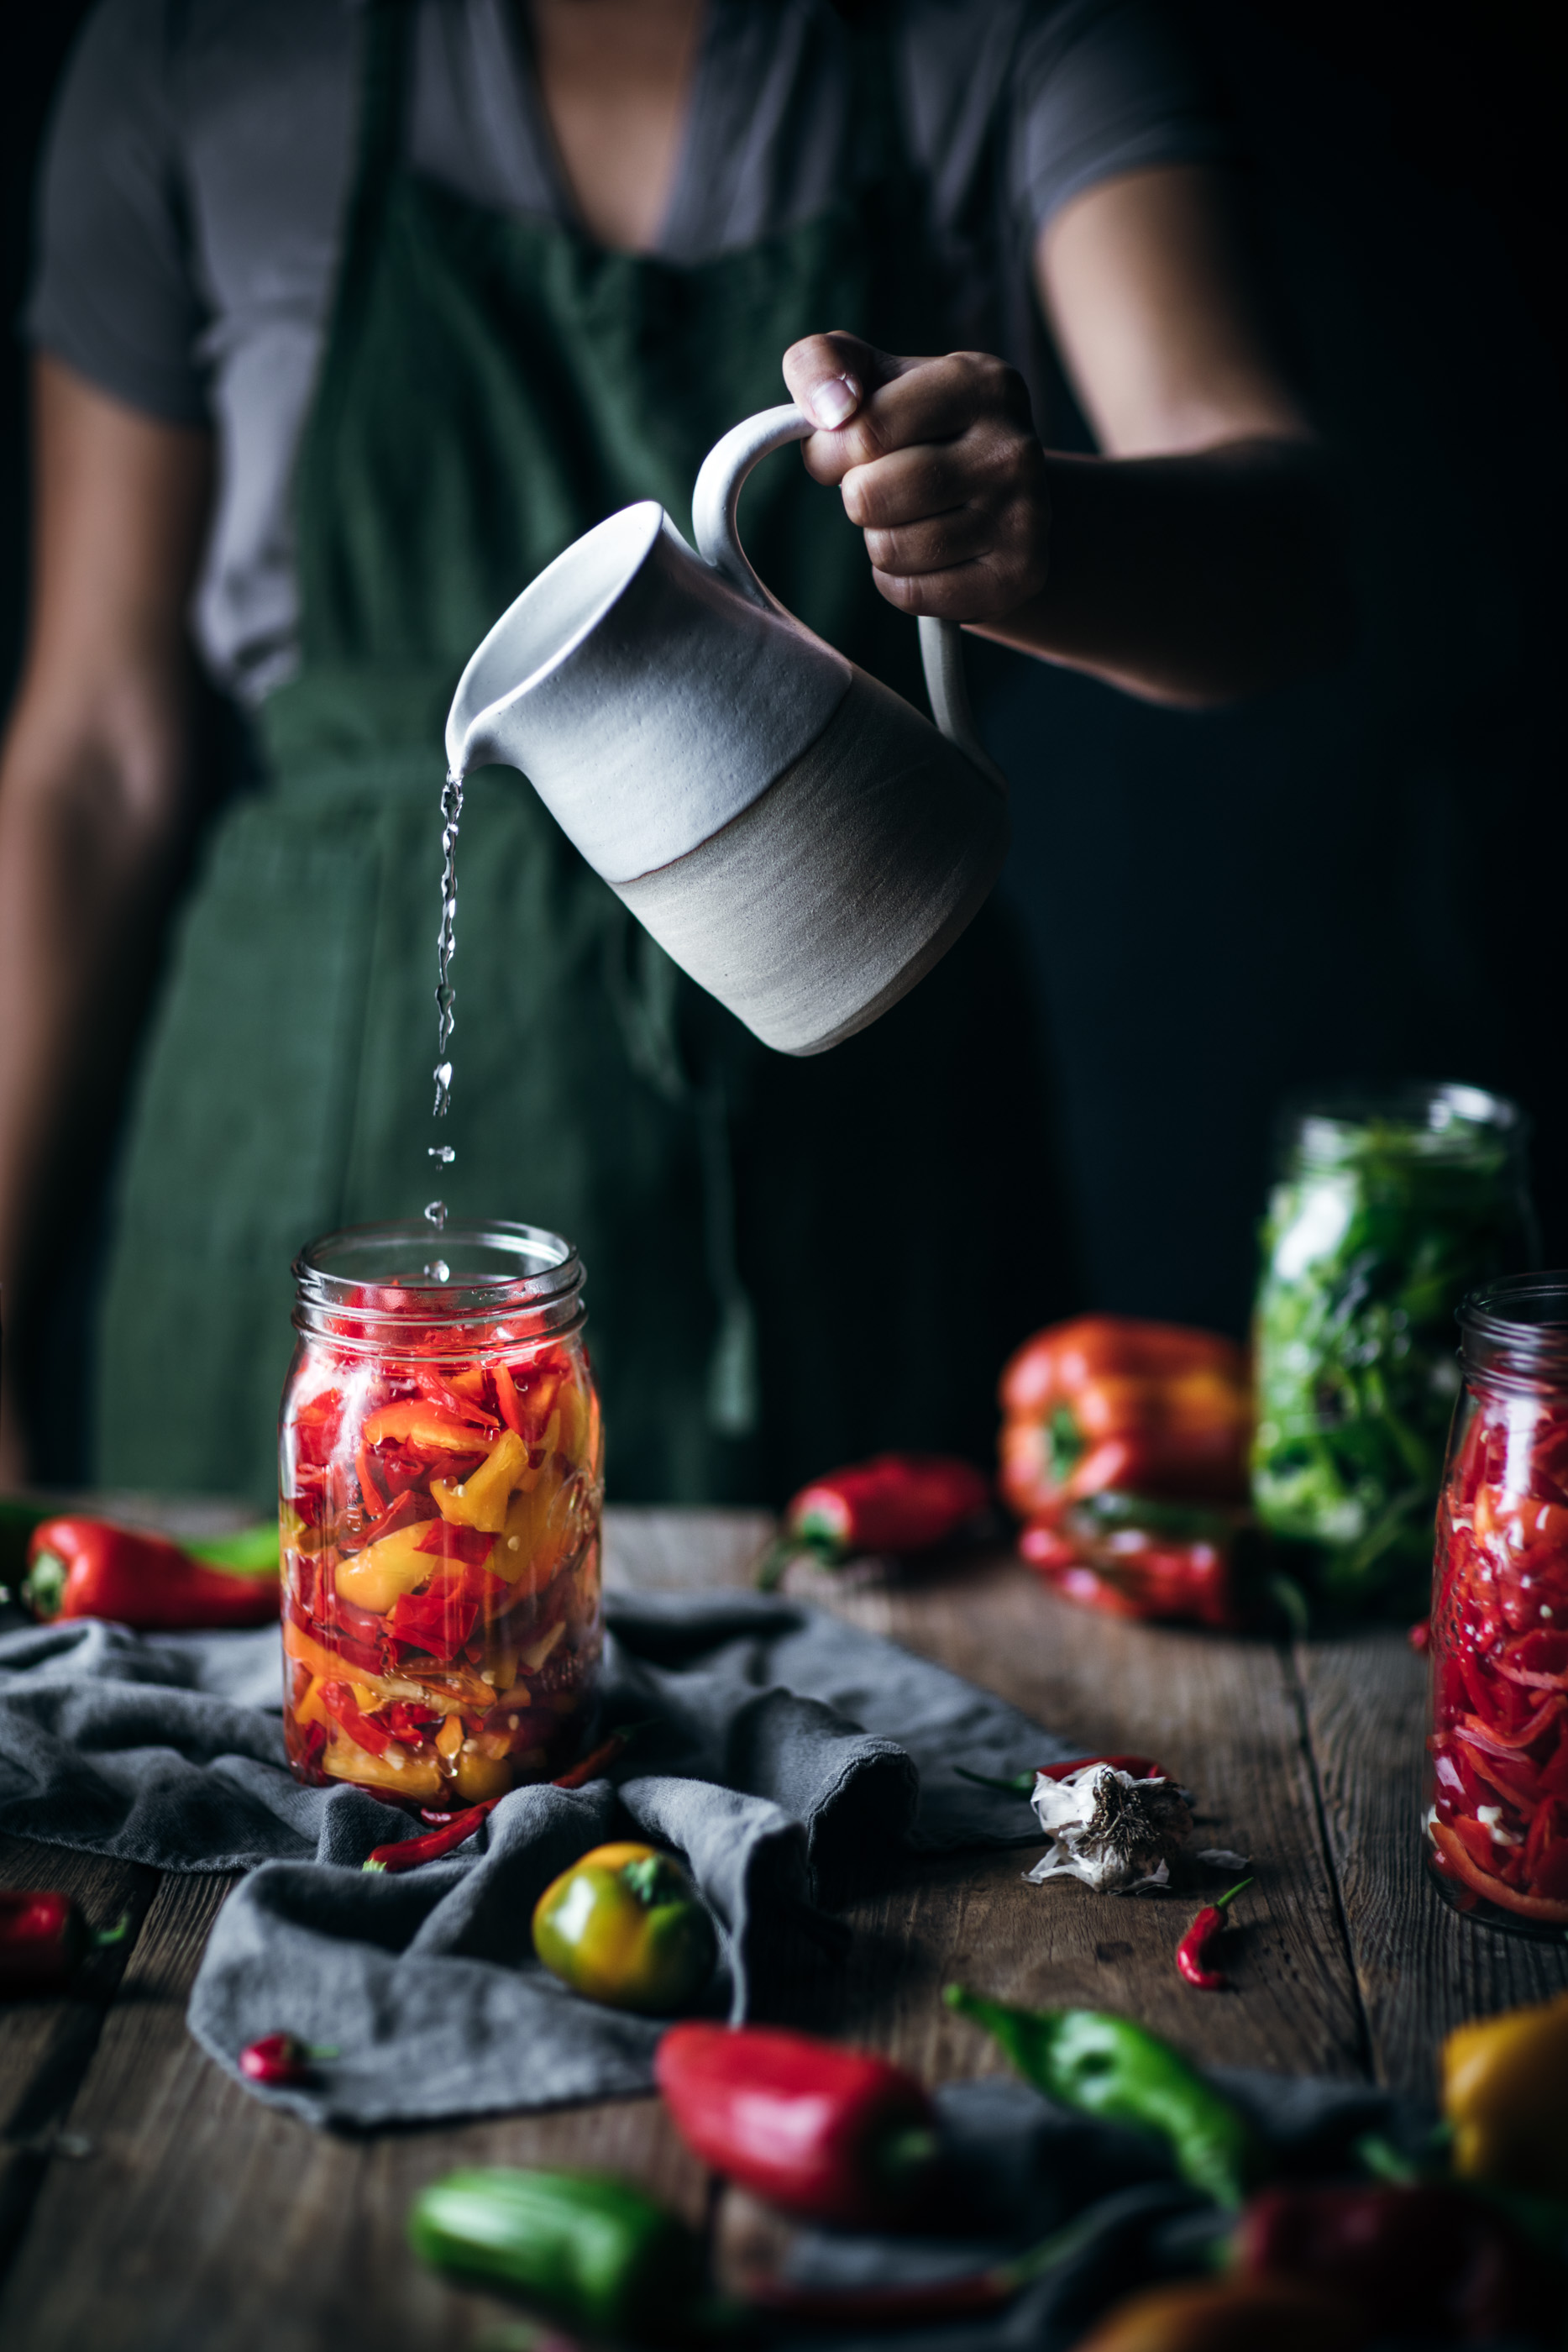
So, the basics are that you put your veggies in a clean jar, fill it with brine, place a weight on top of them to keep them and the weight submerged, put an air lock lid on top, and let it sit out of direct sunlight at room temperature to ferment anywhere from a few days to a few weeks. I’ve let my hot sauce ferment anywhere from 1 week to 3 months, with the flavor getting slightly funkier and more garlicky as it sits longer.
Fermenting is a great way of preserving the nutrients of the peppers and garlic themselves because you’re *not* heat processing them, but letting them ferment at room temperature. When you make “pickled” veggies by boiling them in jars with vinegar, it destroys a lot of heat-sensitive vitamins like Vitamin C and any bacteria, good or bad, that existed on the vegetable. Lactic acid, however, is an excellent natural preservative and probiotic that keeps the food fresh in the brine while discouraging the growth of dangerous decompositional bacteria that don’t like acidic environments. A win for the digestive system and the tastebuds!

Equipment
So, what will you need to make fermented hot sauce? I like to use a 32-ounce wide mouth mason jar as my fermentation vessel for a few reasons. It’s easy to clean and is obvious when it’s still dirty, since it’s glass and you can see inside of it. This also allows you to watch the fermentation process from the outside, which is really fun. Plus you can see if anything weird happens to the peppers or the brine. I’ll talk about it in detail later on, but basically a cloudy brine is normal, but you don’t want to see any mold growing on top of the liquid or any weird color changes going on in there, aside from green peppers turning from vibrant green to dull green. Since you’re fermenting in a glass jar, it’s super easy to keep an eye on the progress.
You will also need glass fermentation weights. You set these on top of the packed pepper mixture and brine inside the jar to help keep the veggies submerged under the brine. You don’t want any of the veggies to be in contact with the air at all, they should *always* be underneath the liquid, as should the weight to discourage any fungal or mold contamination. some folks fill up plastic bags with water and set those on top as weights, but I prefer these glass ones because they’re infinitely reusable, easy to clean/sterilize in the dishwasher or in boiling water, and won’t leech out any weird BPA or endocrine disruptors into the brine the way plastics do.
Lastly, you’ll need an air lock lid for your mason jar. I like using these because they’re clear and dishwasher safe. They are plastic, but since they’re not in direct contact with the brine there is very little risk of any plastic contamination with the hot sauce.

What Healthy Fermentation Looks Like
A healthy fermented hot sauce will start with a clear brine the first one to three-ish days, and it will then typically turn cloudy, which is totally normal. It may clear up a little again, or it may remain cloudy, or the cloud may settle on top of the glass weight like in the image above. All of these are fine. The thing you want to avoid is any severe discoloration of the vegetables, or molds or fungus growing in the jar or on top of the brine. Most vegetables fade in color as they ferment, especially green veggies which tend to become a much less saturated and more muted green (like the green peppers in this hot sauce). But if your veggies make a drastic change from green to purple or red to blue, that’s a sign that something is wrong.
The jars will also be fragrant as they’re fermenting, kind of like a cozy garlic smell, which is also normal. I’ve never had an issue with fermentation at home, and have made lots of ferments of peppers, kimchi, sauerkraut, and green tomatoes. Honestly, as long as you wash your equipment well it’s pretty difficult to mess this up. People have been fermenting foods for hundreds (if not thousands) of years—you can do this, I promise! Just keep it out of direct sunlight in a dry place at room temperature as it’s fermenting and you’re good.

Fermented Hot Sauce

Making homemade fermented hot sauce is incredibly easy and super simple, and tastes SO much better than the store-bought stuff! Feel free to play around with different hot pepper varieties, you can even mix and match with adding a few sweet peppers in to help make a more mild sauce, too. Just make sure the vessels and equipment you use for fermenting are totally clean, but only use food-safe cleaners like dish soap to clean them (no harsh cleaners, obviously). I personally just boil the glass jays and fermentation weights for about 5 to 10 minutes beforehand, take them out of the water, and let them cool to room temperature before packing them with the peppers. For more insight on the fermentation process and best-practices, you can read through the blog post above. Enjoy, my friend!
Fermented Hot Sauce
- 4 cups warm water
- 4 teaspoons salt
- 1 pound fresh hot chili peppers
- 4 garlic cloves (peeled and crushed)
Equipment
- 1 32 ounce wide mouth mason jar
- 1 glass wide mouth fermentation weight
- 1 wide mouth mason jar air lock lid
-
To prepare the brine, whisk together the water and salt in a medium bowl until the salt has dissolved completely. Set it aside.
-
Remove and discard the caps of the chilies. Cut them in half lengthwise, then cut into roughly 4-inch long pieces. For a slightly milder sauce, remove the seeds, for a spicier sauce, leave them in.
-
Toss together the garlic and chilies in a bowl, then place them in the mason jar, pushing down on the contents to try and fit as many peppers as you can, leaving about a 1-inch gap between the top of the jar and the top of the pepper pile.
-
Pour the brine into the jar until it's level with the peppers. Place the glass fermentation weight on top of the peppers and push down to help compact the peppers a bit more. Ideally, you want about 1 inch of space between the top of the glass weight and the top of the jar—you can remove some pepper pieces if needed to lower it a bit.
-
Once you have 1-inch of headspace, add more brine to the jar until the weight is just covered and submerged in the brine.
-
Screw on the airlock lid, with the airlock assembled according to the manufacturer's directions. **Make sure** that the bottom tip of the air lock DOESN'T touch or get submerged in the brine. It should be exposed to the air in the 1-inch of headspace at the top of the jar. If it is submerged, it will not be able to vent the CO2 properly.
-
Store at room temperature out of direct sunlight and allow to ferment for at least 5 days, and up to several weeks. The brine will turn cloudy (read the signs of a healthy fermentation above for more details).
-
When you're ready to enjoy your hot sauce, remove the air lock cap, remove the glass weight, and empty the mixture into a blender. Puree at medium speed until your desired consistency is reached (I like mine a little chunkier, but if you want it silky smooth like sriracha just keep on blendin').
-
Store in clean glass bottles and keep refrigerated.


![Forest Essentials [CPV] WW](data:image/jpeg;base64,/9j/4AAQSkZJRgABAQAAAQABAAD/2wCEAAkGBwgHBgkIBwgKCgkLDRYPDQwMDRsUFRAWIB0iIiAdHx8kKDQsJCYxJx8fLT0tMTU3Ojo6Iys/RD84QzQ5OjcBCgoKDQwNGg8PGjclHyU3Nzc3Nzc3Nzc3Nzc3Nzc3Nzc3Nzc3Nzc3Nzc3Nzc3Nzc3Nzc3Nzc3Nzc3Nzc3Nzc3N//AABEIAHQAlwMBEQACEQEDEQH/xAAbAAACAwEBAQAAAAAAAAAAAAAABQEDBAIGB//EAD0QAAIBAwIDBgMGBAQHAQAAAAECAwAEEQUSEyExBhQiQVFxMmGBFUJScpGhIzNisSUmksEkNDVzotHxFv/EABkBAQADAQEAAAAAAAAAAAAAAAABAgMEBf/EADURAAICAQMBBgQFAwQDAAAAAAABAhEDEiExQQQTIjJRcWGBkaEjM0Kx0VLh8FNiwfEFFDT/2gAMAwEAAhEDEQA/APuNAFAFAFAFAFALNX13T9ICi7m/jSfy4IwXlk/Ko5ms55Iw5LRg5cC+K87Ral4rawh0yA9HvTvlPz2KcD6mstWaflVe5aoLl2dPG0EmzUe0bCXrsThxftzNYzVOp5a+iJT9IjBdPfblNRu/csD/ALVf/wBeVWsj+xGtf0mZhqq5awvrS7A+5MuP/JT/ALVWKzryTUvf+xL09VRXF2jS3mWDWrWXTpGOFkkO6F/aQch9cVpHtFOsi0/sQ8f9O49VgwBU5B6EV1cmZNAFAFAFAFAFAFAFAFAFAFAee1fWLqe+bR9ACvegA3Fw4zHaKfM+rei/rXPkySctGPn9i8YpLVLgzvYwdmrPvUCG81S6mSHvV0xLO7nAJP3VHoPSolFYlq5ZNuTNlpdalaarDY6pJbXC3MbNFLBGYyrLjKlSTy58jUxlOM1GfUrSatEX1teNqt21mEUS2y5Z48hiCwwD5HBrHNjyPJLR1ReMo6VYxTMOljhxSBkhwqNzYEDpWzuGDwrhFOZGDSIIOOv/AC7SRIMERFJB756+dc/ZIx24tfCmXyNk63qSQzCxbTmvRJA0siZX4BgHAPxHn0rozZEnocbKxj1uheIbns/Et5pAlutIYb5LJsl4VP3o888D8J+lZpPD4obx9P4LWp7S5PR2N5Bf2sd1ayrJDIu5GXzFdUJqauJm006ZoqxAUAUAUAUAUAUAUAUAl7S6nPaQxWWnBW1K9bh2wbmE/E5+Sjn+lY5cjjUVyy0Ve74FF08PZi3stNgnNstw7SXOpTDO4jm3PzkbHIHoPbFZOsSUV82X87bHjRQ67o+NQtZIYpxu4ch2unPKty+FuQPqK2pTh4im8WILCZ5r5zoAn1KVBwm1O/kzFEM81TA8R6Zx9TXPctX4e79XwXdV4thmLdt4XUdcmklyoMcGI1BbpyGTg48zUSh/qZH8thdcRLYY7JtwhvboMknD/msfFWSjhd6ZvZ1z1JbkuUS7anAgms5YtRhx/LfCOR8mHI/WtY99HeL1r7keB8qhbYwpq98stvfNGLa67xJazxHvEDnqobPJG9iPQ+iC7yVxfHR8ol+Fboda9qP2Vp7XK8NpAyhInbBlOfhX1YjOPnXRmyd3HUZxjqdCS3uYdJvIdRsWzoupSATJ07tOTjdjyyeTDyNYRmsclOPll9maNOSp8o9aOldpiTQBQBQBQBQBQBQEGgPOaCv2nreoa1J4o0Y2dp6BEPjYfmb+1c2LxzeT5I0nslEeX1nb39rJbXcSywyDDIw61vKKkqZRNrdHlpoZNWuv/wA7b3U7abYqBqFw75eXPNYd3t8R64x61zNan3aey5NF4VqfLOr69vHsYU7O2sHcwoktminVd6r8SmMgeHy5GoySmofhoRSvxGOxthdyNHpkiy2bLHO/EcjgjBIi3D8xPLpXD3feNrG7XPt8DXVp3Y/uLGTbbNbRWyyRorAK55kc8D1HzPrW2bs8vC8aSa/z5mcZpXbFSvNFJEbAmWXJluQJBHw0VjiPLdBk86wwuSru93y/gvT6mkkt9RovIJdRkFzacK11+1jEgWN9yujE7Uc4wVbB9q7pRc3qW016GSdbPg26KtlqzJrW1zckcMpK2e7MOTKo8jnqeprXFoyfidf2KzuPhN97p1td6fPZSRqIZ1YOFGOZ8/fPOtJ44yi4vhlVJp2Yuyl5Nc6WIbs5u7ORracnzZfP6jBqnZ5uUKlyti2RU9uo6rcoFAFAFAFAFAFAYdbuu46ReXY6wwO49wOVZ5ZaYNkxVsp7M2fcdA0+3+8sClz6sRlj+pNRhjpxpEzdyZo1a9XTtMurx/hgiaQj1wKtOWmLZCVujzFvEbDsva6fLbPdX2qI8lxHHOsUjs43OwJPlkCsEtONR6s0buV+gpuVutM0OwsdUshBcwuFs9QgYNwwTlt2Oe7bnIGQ1cuW4Y1GS36NGipybTN9hJbNb2qae8dvC1s0dwzneFUvgMcffPz6ZrHVGkoOlTv/AD1ZLvmQzVolSOSykmEph8Cztu3BuWB6Hl7VWTiqeNu669f7kK+JCzVJrBLi3JR5YtsYnhQ5M4xy3D1DY5E86pKWJSi1utr+Pv8AMvFSplub+01d9cvtMWKBYQiql0qiGMZyZM9Tg8sdOYrvWuOTvJRrb149zJ6XHSmM7TFh2tuIE5W+pQd5QDpxFwrfqNp+lbR8OZrpJWUe8L9D0RrqMzz9gO69sdRgHJLu2juQP6gSjfttrmh4c8l6qzR7wTPQV0mYUAUAUAUAUAUAj7bn/Kmpf9nH7iuftX5Mi+PzIcQ4EMYHTaP7VtHhFXyIu3x/ylqA8iEB9i6g/tWXaPy2Wx+ZCnt2ZO/aPFZ9476CXshEVKGRSvxqee3B+IHl0PWsu0J3HTz0L4+HfBgRVs0F1xzaXWm3fEl0uSVeGSR4miJ54ZWJAzjyrGT0rVdOL4LLfbo+oyh/xG2tpoFiW7u4Zn4kBAyAeUbAcvhIyfIisZrvYpxq2nx+xKel/BG+SSC4jgltVZEgtd0m04O3yT9jVMkoZFGWP9Md/wCAk42n1Zl1R0eUaSj21rFNw3MgKjhAcyDnqcgYq05LUsEaSdP2Cutb3EmsKeDc3Cd8n0wTgXV8GUzTOmdu3I2rGG5Zx55qcm6bVuPV9f8AomPNdT0l4WOtdmHPxsJg3i3cuFk8/PmBzrtk/wATG/8AODJeWR6bNdZkIJ+Xbmzx56fLn/Wtcz/+hezNF+W/cf10mYUAUAUAUAUAUAs7TWzXnZ/ULdBlnt3Cj545VlnjqxyRaDqSYsn1K5l0LRrmxuVgW7aFJJmjDlQ64GAeWd2B9az1yeOLT5otS1NMUmw1a90+4tr24vLhry0uIX4qgLHNG/gIAAADCs9M5Rabu0/qWtJo2XV9d3/ZfTdX069FnIqr3iRow+1cYkBXBJII6DHOrSlKWNTi6ISSk0xTp+nd97P6fqFpbJcahJcmSa+u2yCELc2LcwrYAwBgZrB49WNSSt3yy7lUmmbYwt/e3EujrBZyxRkOI35zcvFsAGMZGNw9Kwku8m5Ytmvv7FrpJS3NGnZujcLaPwFYs7s55BCOh/euTBeVyWN16+xefhpyOZ0S+tYoLSxt5OBKrTx7svMAw+HPUEc+fpiujGo5YKGOK2e/q/Ypbi7bMs0M9v2juNK0a7NlC/CLW20srBsl2TIIQ48uh510OLjmePG6W2xW04apbjPVDcXPaJ109Q0umafIU9OLJyUfov710Tbll8P6V9ykaUN+pXDearx7ErJcxRNJHBHb3EQ4k6gfxZHPVceXTp8xVVLLcXe3H8smo7m6D/iO29w45raWCRk+jO5b+yitV4u0P4IrxjPQV0mYUAUAUAUAUAUBBGRigPN9lQtsb7Q5wCbGcvEGHWFyWQj2OR9K5cG1430NJ71IjUtbu5ZrSHSODG8s88Ra5jLZeIE7AARjdg8/QdKvLI20ohQXUw6ZdfY92ovIXg0rWcTRiVSvdbhxlom9NxJI+eazg9L34f2Ja1LblGmfsvcGZY47lJdPhjPd7CUARI4+AEKOajmefU0l2dt87enQhZFXxGWh6XJpto8FxwZCju0UiJtOG5kY8uZPL0qcOF44NS35E5ansLuyKhzOrKCpjGQfc15f/iknOafob9oeyNN3oU13czyu0K8TJjZQQ8JAARlb6cxXa+ySlOUm1v8AVehksqSSK229nrI3uozte6k6iKPCjfKx58NcDmN2eZ6A1r+RHVN3IjzulsjnSpotCXbrJaO6vm4892y/weIeWzd5YGAM0xtYlU+X1Elr8vCG8GpwTTXgUYhtMB58+AnGSB7DGfet1li7fRGemqF/ZBHmtbjVZlIk1KczgHyjxtQf6QD9az7Om05vqXyc6fQ9BXSZhQBQBQBQBQBQBQHne0tvNZ3Nvr9lG0ktopS5iXrNATzx6leo+tc+ZOLWSPQ0g7Wlmi3stHmkTtBAodmQyrKjMVPhwWC9N23lnGfKrKMPzEVbl5RRe3N1q9/NaBLe606WKKSO1dMd5t35NIrkjDKT09vXNZyk5yaW6LKoqzRbnVdAkNqhbVrBACoDjvUC+WQcbx8+tLnidLdfdDwyV8M1z61BfWxisLyGCduRW6BjZfofOs8vaIzhphJJ/HYmMGn4kY9JtpdNl4pu7MKRhhxc5Fef2bFPs89WuNe5tkkpqqYyudaZgU0y2e7l/F8ES/MsfL2zXpPtWrbEr/YwWPrJ0LL2xvLG1n1y6mhutTiUFSyEw28eRu2KOfTz6nFVlCcIvLJ3L7IlSTelcGzTNZGpO9pdWLEFjGZol4tvIQOYDY/uMeWa1x5u82a/giUNO9mLUbe3uZY+zGkxLDbfzL4xchHGTnZ+Zj+2apNJvuYbLqSn+uR6qNFjRURQqqAAB5CutKkZHVSAoAoAoAoAoAoAoCCMjFAeVuLe57LXUt1YQvcaNMxe4tIxlrZj1eMea+q/UVzOLxPVHg0VTVPk36FY6L/1PR9rpKm1HSQsqKTkqgJwvPqBjpV8cYeaJEnLhiDSYTqmrzz3ghW7mlLNGXeC6tEXkoX8SkAEjkMk9a54x1zbfP3Rduoj+/uQmrRwTQxS2ixLxWdAxQsSFPty5+9Tlmo5FGSuNbkRXh2e5faW8c9pvggtoXLsAVhBGASKjHijOFxST9iJSadNnWnIbmyk71IZd5aN0IAUYJUgACr9mTlj8T+H/BE9nsVaLFMthPpt9GzLbsYFdxkSxY8Jz5+E4PzBq+FPS4S6bCT3tC5r5rSCHs/2fIur2GMRvOw8Fuv4nI5bvRfOs9eld1i3f7E6b8cuBzoulRaVamJGaWWRi80782lc9WP/AK8q3x41BfErKWpjCtSoUAUAUAUAUAUAUAUAUAUB5687NcO6e+0K6bTbxzmQIu6GY/1p0z8xg1g8NPVB0y6n0lucR6rqdnIPtvRWYoMC6sP4qY/L8S/vVXllDzx+hOlPhl8eq6JcTTSG5AeZBG6TBk5DPLBHzNZvN2dtuT59dhomuDVaXmm2lrHDFdxsiDAO/Jpjz9nxQUVLgOM5O2jO2q28IddPs7q6dmLbYoyASf6mwBUR7TjW2JN/Il43+ooey1vVztvrhdNtD1gtW3SuPQv0H0H1q+jNk870r0XP1FxjxuONO0+1022W2soUhiBztUdT6n1PzrohCMFpijNtvdkalLNb2plg4e4EAhwcYJx5e9JtpWgjBFq8jXq2jxR8TvBjYqfuAHxe+4YxWfevVponTtY5HStypNAFAFAFAFAFAFAFAFAFARigIeNH+NFb3GahxT5RNs5WGJfhiQeyiq93D0QtneB6VeiCcUAUBDKGGGAI9DQHPCjznYueucVFIHdSAoAoAoCDQFFpdxXYlMJJEUjRNkY8Q61WM1K6Jao0VYgioBNSCm6uFtreSd1dljXcRGhdj7AczVW6VhFqncAfWrAmgCgIzQFNrdxXSs0LbgrFTyxzrLHljkVxJcXHkurQgM1IJoCM0AZoCi0vIbsSmEk8KVonyMeJetVjJS4Jaoz6rqDWQjWOMO7565wACBnl16jlVMk9PAirLtOu++WwlKbGzgrnODVoS1Kw1RpNXIEGiX9pb/aEc91BG/fpTteQA9a5cM4q031ZeSewvvr9IdK1yN7rbMLxgimTxAHbjHnjrWUsiUZq97LKO6OdSm2668IuZxpTTR99ZX8Mcx+FA2chW8O4D5epqZN95V7bX7hLw/E4vtRWHR9aie72XI1BlReJ4wCy4AHXGP2qXOoSV72Et0V6jEGt+1V+09xx7Z3jgxO4WIGFCcKDjqalq9cvT+ESv0o6vGtpn1uXU76WC4tQO67bhkMScMFWVQcMS2fI5Ix8qNpuTb36EelGm11B4jqh1G44M7WEEmx224Yo2do/N6VPeVqt70g48E7i0UMrzLLssomMbTtE8fhzuXyYn5+lYT4Tu9l1r6epK5ofXk57gpiyJJwEjDdctW+bI+58PL4+ZSK8W4u4bw3otp0WG3vYeCpjlJ8ajkc4GDtz+lYwUoT0tUpKvmi20la5QplubzUNOvtzyCXTdOmhl2EjdcEEE8vQLkfnFNc5wf8AtX3J0pNfE1X+oRz3VstrdCT/AAu4duHJnyXBOPPrWksltJPowls79TiNU0bTdM1njTtHsU3rSTM+5XQeLBPLDBemOWahfhQjk+pHmbRmnS+4mmW96yEXUUtxIlxdPCplJB2blBPhU8l6cj6VWWu4qXW3yStO7R1aObj7OttRvA9g8lwFdJ32uykbEMhALYG/32+dIu9Km9t+odb0U28tv3RbWGSS4jn1Kfh7roxpIFGfHJzYj264qE46aXq+pLT6+g17LIl5bXkMzLIlveMIdk7Pw/CpwrnDYyT/APK27OtSafqUntTR6OCGO3iWKFAiKMACupRS4Mzs1IKGsrRmLNawFickmMZNZ93B8om2dPa27ycR4Imkxt3lATj0zU6Y3dC2SYISjIYkKPksu0Yb39anSvQizlrS2eXivbwtJjbvKAnHpmjiuaJtnZhiIcGJMSc3G0eL39aUiDiS1tpZEklt4nkj+BmQEr7Hyo0n0JtkyW0EkiySQxu6fCzICV9jRxT3aFsGt4H274Y22fDlAdvtUOEXyhbLCoJBIBI6cqtSIKr0AWzvgbkUspIzg461WfFkow9nogunLMzM8tyxmldsZZj7ewH0rPAvBfqWnybo7S2iBEVtCgOchYwM56/rWijFcIrbLGijMfDMamPGNpHLHtVmlVEHM0ENwhjnijlQnO11DD9DUOKfKJuiJLaCSHgyQRPF+BkBX9KaVVULZD2ltJGYpLeFoyclGQEZ9cVGmPFC2WRxRx54aKueu0YzyxVkkuCDupB//9k=)
0 comments